Latest Event Updates
4 Steps How To Split a Video
More often than not, videos that have just been shot contain elements that are unwanted or unnecessary. At times, they could be too big for DVD burning or to be played on mobile devices. The answer to all these concerns is video split wherein the shots are divided into manageable pieces. The parts that are unwanted need to be cut out.
For the purpose of discussion, the app that will be used in video splitting for this article is Movavi.
Effective video splitting all begins with an effective video splitter. Movavi Video Editor provides an uncomplicated way to split the videos as it also allows you to edit movies in a lot of different ways.
Splitting the video means you chop it into smaller parts so that they can be extracted or copied, if not uploaded to the Internet. Every split part can be played back.
Should you want to join videos, then you need to merge files together. This can only work if the files come in similar formats, meaning, you can only join .wmv with a like file.
Video Cutter Installation
Step one is to download the video editor. Next, open the file for installation then have the program installed by following the instructions on the screen. Movavi Movie Editor comes with an intuitive English interface. It is basic so even a video production newbie will learn how to work with the app within five minutes.
Use the software to split and join videos; also for other video editing tasks.
Select the File for Splitting
The next step is to choose the file for splitting. To do this, click Add Media Files then cilck on the video for splitting. Go to Media then move your clip to the Timeline right on the program interface’s lower part.
Cut Out the Unwanted Parts
You can, at this point, slice the video by using the Video Editor tools. The built-in Split Movie app can also be used to do the same thing. The Video Editor tools are more appropriate, though, if you need to cut just a few parts from the videos. The Split Movie type is best used for any multi-splitting task.
Cut the videos using the tools. Go to Media panel, drag the video that you would want to cut to the timeline board. Have this video clicked then place the red marker at the start of the unnecessary scene and click on the picture. You will then s ee that your clip has been split into two.
Drag the red marker to the end of the unwanted segment then have the clip split to two again. This should separate the unwanted segment from the rest of the video.
Right-click then Delete. Slide the two parts, join them then your video is now ready.
Save All Edited Videos
Now you need to save the video to its right format. Click Save Movie then pick from the options. Save your video file by saving as a 3D movie then burn to DVD. You can already upload this in YouTube, Facebook or Vimeo.
To use on your tablet or phone, be sure to convert the video to its appropriate format.
The Do’s And Don’ts Of Video Production
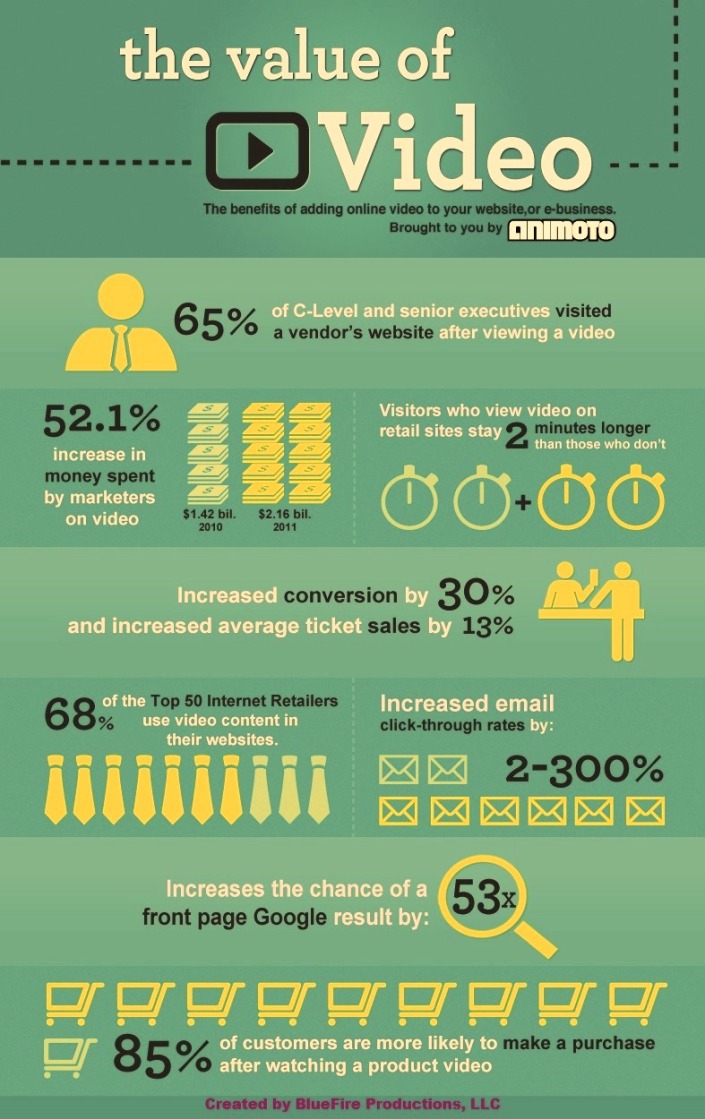
Video marketing has been creating a lot of buzz lately. Organizations, companies and even celebrities now rely on the viral power of social media. Going viral is one of the key indicators that the brand is effective. Virality means your video is being liked, shared or commented on. This means that the content you just published has caught a lot of people’s attention.
But before you become an overnight sensation or an eventual success, you need to know what you must and must not do. Otherwise, you’d be left groping for success.
First, the Don’ts
- Avoid shaky shots. If you have a tripod, use it properly. This equipment helps each time you move the camera. Just make sure that the camera you own fits perfectly to the base of the tripod.
- Needless camera adjustments are, well, needless. Remember to move your camera only when necessary. Gather no less than 10-20 seconds of useable footage.
- Uncontrolled or slow zooms and pans.
- An uninteresting shot. Every shoot must be visually exciting. Make sure to follow the rule of thirds, with the subject’s eye on top of the line and his gaze following the opposite side of the frame.
- Unbalanced shots should be avoided. Everything now is in high definition so make sure that there are no random papers, extension cords or whatnot on the background.
- Do not ever eat up the entire frame. Make sure to leave some space (especially the lower thirds) for images and logos that will be added later.
- Never deliver an unfocused video. Be sure to check the focus each time you alter the focal lengths (zoom the camera in or out).
- Steer clear of intricate patterns, logos or stripes on the actors’ clothing or makeup. Remember that you’ll have difficulty finding the correct light for white. Green is also not advisable especially when you will be putting some green screen effects in your video.
- Do not be unfamiliar with your equipment. Learning about them is not when you are already shooting. Read the manuals and test the cameras, lighting and other equipment before you use them to shoot videos.
Then, the Do’s
- Point the boom directly at your speaker so that you won’t produce unnecessary noise.
- Secure all wireless lav or equipment before you proceed with the video production. Ask the subjects to remove clothes that rustle and any jewelry that jingles.
- Be sure to allow a few seconds to pass after you hit the record button at the start of the interview. This is to ascertain that the first part is recorded and that the editor has ample room to edit.
- Put ample lighting. Three-point lighting comprises the fill light, key light and the back light. It would be great if you can also provide an eye light. Consider the skin tone and the clothing color of your actors because these can affect the way the light hits them.
- Have the person being interviewed speak directly to his interviewer. His chair must have an upright back, one that does not have wheels and does not swivel.
- Always be prepared; make sure there is backup power of batteries that you can easily access. Pen and paper are always useful to have as are extra cables, ample tape, dresses and props.
How to Hire the Right Video Production Company for Your Web Video
Okay, it’s a given that not all video production companies are created equal. After all, the most effective online marketing videos have powerful, believable messages to deliver so not all videographers can offer you that. When faced with the difficult decision of hiring a video production company for your marketing shoot, be sure to consider these few points –
Search for a Specialist
Don’t take someone who just knows to operate a video camera. There is a huge difference between an amateur videographer and a pro who has done many video projects in the past. The creation of a professional video also requires editing, script writing, even proper branding so be sure to find a company that has a consistent high standard in terms of quality.
Check the Video Producer’s Credentials
Look for the production company’s past projects, show reels and portfolio. Reflect upon their past video projects unless they tell you that they have created commercially-sensitive projects, then don’t force to look beyond the tip of the iceberg.
Search for Case Studies and Video Testimonials
You’ve got to ask yourself this – is the company as good as they claim they are? Look for customer satisfaction surveys or case studies. Be careful in trusting testimonials, though. Make sure that those who testified have verifiable identities and contact details so that you can ask about their past projects. There are many so-called testimonials online that only show the customer’s first name. Don’t be too quick in trusting written testimonials.
Look for Online Reviews
Online review page in Google can serve as a reliable record of performance levels. This can be found on the Google+ page. Such reviews are real and can never be forged so you will find truthful insights in there regarding video production companies. Those reviews will tell you whether the customers were pleased or pissed with the video that has been made for them.
Present a Brief
You must create a video production brief to ascertain that your video would achieve what it needs to present. The rough brief should help the video production company understand the objective of the project. In many cases, the production company can quote a price without even meeting with you. When this happens, it’s time for your red flag to be raised.
So take the time to discuss your brief with your list of probable hirees.
Discuss the Cos
After the initial meeting, the video production firm must be able to provide a quote for your proposed project. Just be sure that the company writes – in black and white – the cost per minute as well as your other specific requirements.
Discuss any budget limitations from the onset.
Will They Connect with Your Audience?
The online world will always be a busy world which is why you need to find means of connecting to your target audience. In today’s market, pretty pictures are no longer sufficient. The video’s message must be powerful enough to dispel clutter and to engage your audience.
Agree on the Deadlines
It is also important to agree on the video production deadlines. Both parties must work towards a common goal which is to deliver a structured, detailed video.
The video production company must guide you in deploying your company’s message to the world so choose only the best.
